August 3, 2012

The Out Wales

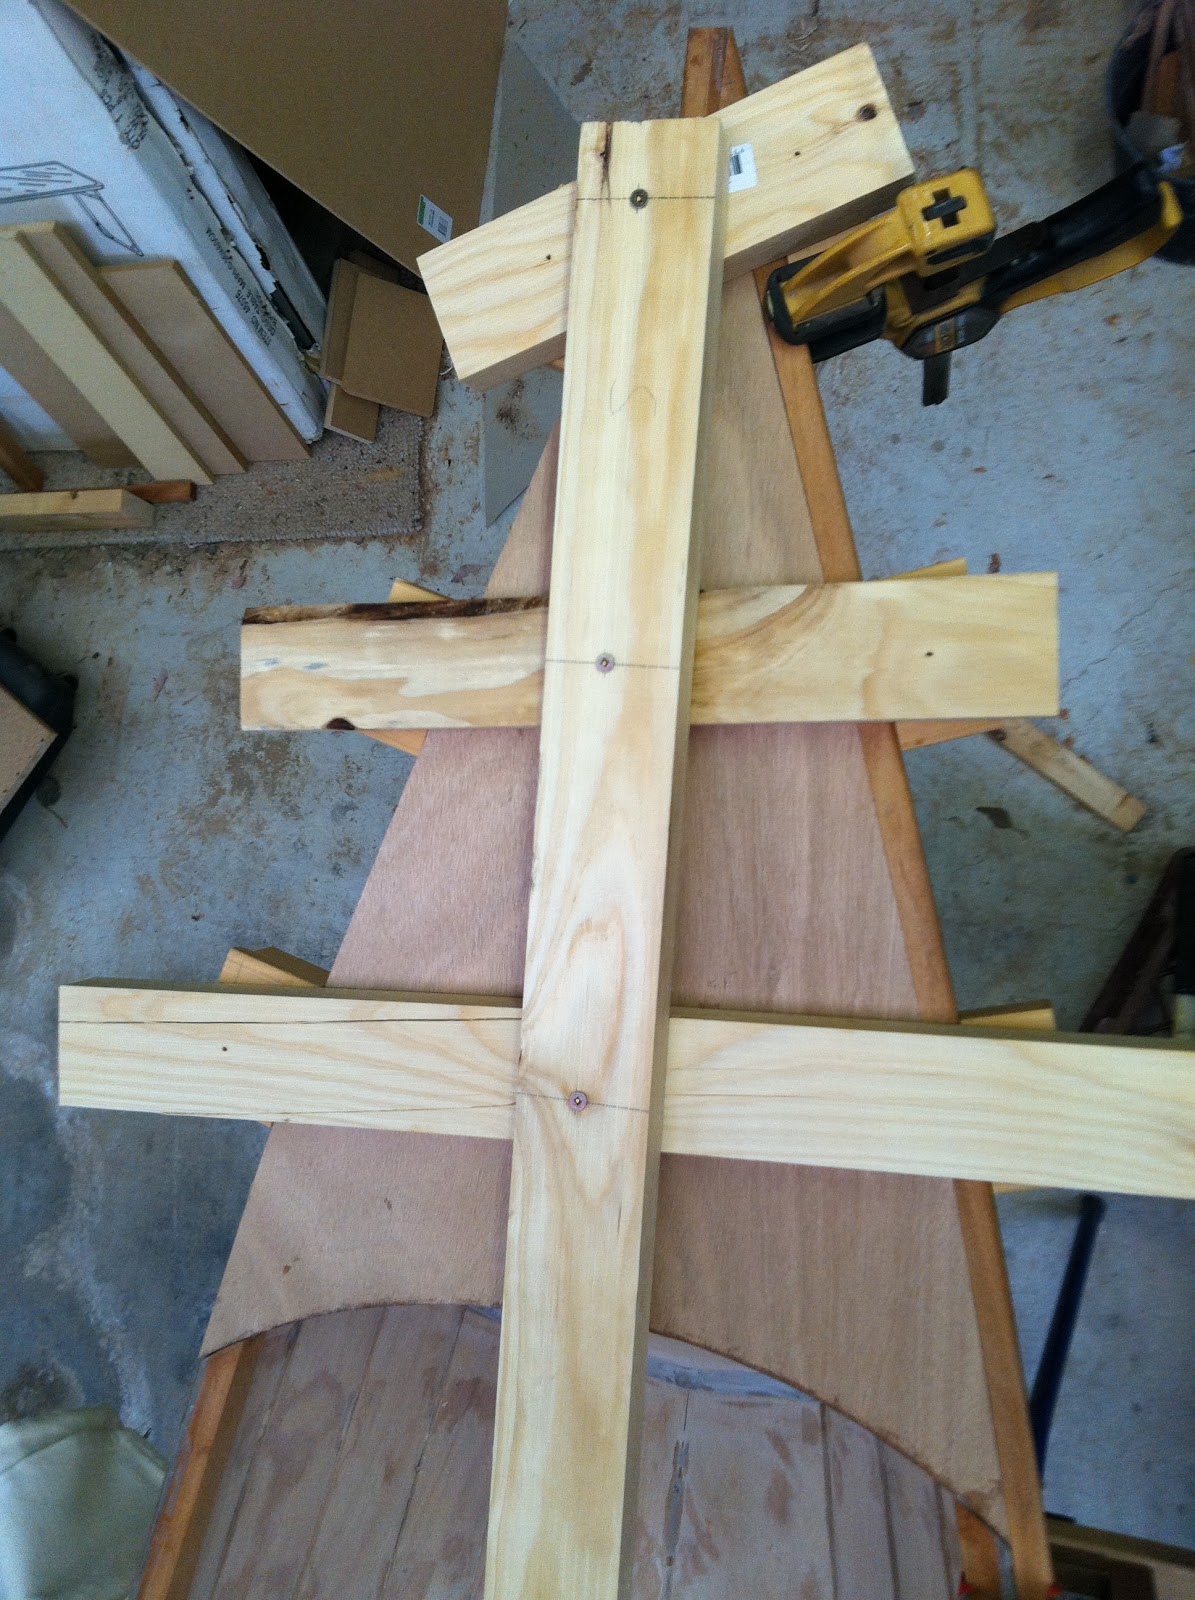
The next step was to glue on the out wales. I would be able to clamp it for most of its length but up near the deck there would be nothing to clamp to. I did not want to have to screw it on and then try and hide the screws so I spent a lot of time thinking about how to achieve this. Finally after a lot of thought I built 2 of these weird looking braces and used them to hold the out wales in place while the epoxy dried. This took a lot of set up and the tension required on the rope that was holding the two braces together was so much you could almost play it like a guitar string. But it was worth it. The result was exactly what I was after a seamless join with no screws.


All Clamped up
The Out  Wale Glued in Place

August 2, 2012

The Deck Part 3

Finally it is time to glue the deck in place. I did not want to put any screws or bolts through my beautiful deck so I had to come up with a way to hold it down. Lots of trial and errors and eventually came up with this. Four pavers left over from the garden make over and a couple of weights from the home gym. I used thickened epoxy as I had done for all of the other joins in the boat. I left it all in place for about a day to make sure that it way firmly in place before I removed the weights.

Once the epoxy had dried I was able to cut the extra ply wood off and finish it off with an electric sander.

Holding the deck in place while the deck drys.

August 1, 2012

The Deck Part 2

Inside the baulk heads
after epoxy
After spending a lot of time fiddling and sanding to make sure everything was just right it was time to glue the deck in place. But before I could glue it down I had to seal everything with epoxy so that it will not be affected by any water that might get in. This was the first time that I had used the unthickened epoxy over such a large area. At least if it does not come out so well it will be hidden away. I coated the underside of the deck and the inside of the bulk heads with 2 coats of epoxy. It came out pretty well but part of me is glad that this section will be hidden away.


The inside of the Deck after a coat of epoxy

July 31, 2012

The Deck Part 1

Well it is time to start working on the deck. I cut out the basic shape using a cardboard template and my jig saw. I made it about 2cm to big on the sides so that I could bring it down flush at a later stage. Then I cut it down the middle and got this edge nice and straight so that it matched perfectly with the brace down the centre. Getting this spot on took some time. Next I had to flatten out the area that the deck would sit on. Although it had to be a flat surface it was on all sorts of strange angles. This also took a bit of time again because I wanted it to be a nice flat surface. I think the deck is going to come up quite nice.


July 30, 2012

A Bit of Fancy Stuff

I decided that I wanted a bit of fancy work in my deck. The book that I am working out of suggest that you can just sit the deck on top of the gunwales but I had seen someone on the internet make a flush fit deck and I thought that would be good. I also wanted to put a feature strip of wood in the deck as well. Sounds easy but I spent a lot of time trying to work out how I was going to achieve this. The main deck piece would need to be cut half and strengthened up the middle so it did not collapse if someone sat on it. I would also need to cut away a piece of the inwale and the hull to make the deck fit flush. I forgot to take any photos of this process but you should get some idea of how it was done as you look at the following posts.

July 29, 2012

Gluing in the Inwales

Time to glue in the Inwales this was a lot harder than I had first imagined. The Inwale is 16ft long and very thin so it bends and wobbles all over the place. On side is covered with sticky epoxy that you want to avoid touching with your hands and you certainly don’t want it on your cloths. Now you have to bend it to the inside curve of the hull and clamp it in to place. I started a one end and clamped every 40cm or so and slowly worked my way to the other end of the boat. Then I went back and put more clamps on so that everything was held in place firmly while it dried. The blue tape under the inwale is to try and catch the epoxy as it squezzed out. this helped a lot although i had to keep going back to clean up the drips that extended pased the tape. Better to clean it up now rather than have to sand it off latter. As you can see it used a lot of clamps, more than 30 in fact, and although it did not use every clamp I had it certainly was most of them so I could only do one side at a time.
All Clamped Up

July 28, 2012

The Fix

Question:- Now how to fix the crack in the inwale.
Answer:- Walk away and leave it for a week. Come back to it when the mind and body have calmed down a bit.

First of all I had to cut a new piece of wood to join in. Fortunately for me the break happened close to the end so the new piece only had to be about 700mm long. Then I cut a scarf joint on the old and the new piece to epoxy them together. I use a backing board to make sure that everything lined up. Without the backing board, the exopy acted like a bit of a lubricant and slid all over the place. As you can see there were lots of clamps to hold everything in place for such a short join.

The next day the clamps came off and the clean-up began. It cleaned up quite well and it is hard to see where the join is. When the boat is finished it will be hidden under the deck where it can’t be seen anyway. I refitted the inwale back in to the boat and all is well again. The area where the fix is does not quite bend as much as the wood on the other side on the deck but it is hard to see it if you are not looking for it.

All Fixed

All Clamped Up

July 27, 2012

OH BUGGER

While dry fitting one of the inwales there was a nasty crack. A closer inspection revealed that a knot in the wood that I thought was only small went almost right through. With all of the bending to try and make the inwales fit nice and snuggle inside the boat was too much and it let go. More than a few swear words were uttered I can assure you.


November 25, 2011

The Gunwales


Dry fitting the Inwales
Now it is time to make the Inwales & the Outwales. These are the rails that run the full length of the boat on the inside and the outside. They give the very thin piece of plywood a lot of strength. They are easy to make, I simply cut them on the table saw out of a 1” X 8” X 16’ board of mahogany. I found a couple of knots but I will place them in a position that will hide them and hopefully they will not affect the strength of the wood too much.

For the outwales, I ran over them with a 1\4” round over bit in my router to take the edge off them. The inwales were not rounded over as I still have to fit the seat doubler (bracket) to them. Next the process of fitting them in to the boat, I worked with the natural bend in the wood and started fit the inwales. Then I found an error…… I had cut out the notch in the bulkheads ¾” X 3/3” and the inwales are ¾” X 1” so I had to cut it an extra ¼” deeper. This would be easy if I could lay it on the bench but it is already epoxied in place so it was rather tricky. I spent about 30minutes on each notch but I was happy with them all when I finished.

The ends of the inwales have to be cut on a complex angle so that they match up nicely at the front of the boat this also meant lots of filing and sanding to get the fit just right. But I was very happy with the result in the end.
Dry fitting the Outwales on the Sasafrass 16

November 18, 2011

Stopping the leaks!

Using 150 stiches to hold the boat together during construction meant drilling 300 holes in the hull, not ideal if you want your boat to float. So now I needed to fill every hole in to make sure that the boat did not leak.

I turned the boat over to start the filling from the inside only to find that some of the epoxy had leaked through the seams and needed to be cleaned up. I gave the hole inside of the hull a sand to clean up the leaks and get it ready for filling the holes.
All of the holes filled in on the hull.
I hope the dots all disapear later.

I did not want to have the grey epoxy fill in the holes as I did not think this would look that great so I made a jar of wood flour by sanding a piece of pine for ten minutes with my belt sander and collecting all of the dust. The idea was that I would use the wood flour (saw dust) to mix with the epoxy and use that to fill the holes. I had noticed that the epoxy made the wood a darker colour when it soaked in. My hope was that the pine being a lighter colour than the ply wood, would mean by the time everything dried it would be a pretty close match. That was the plan any way. However the wood flour did not mix in to the epoxy very well. Everything started off well and it appeared to mix in all right but as I was putting the mixture on to the boat a lot of the fibers from the wood stuck out and it looked terrible. I stuck with it and filled all of the holes but I am still not sure how it will turn out.

Once the epoxy had dried I sanded everything back and was left with a poker dot pattern on the inside of the hull. I think the darker patches are where the epoxy has soaked in to the plywood. Hopefully when I epoxy the inside of the hull these will all disappear.

November 11, 2011

Re-working the Seams

Now that the Stiches are out of the way I went back and cleaned up the drips of epoxy that had run down the side of the boat. I also cleaned up the epoxy in the join with a round file. This revealed a lot of holes and ups and downs in the epoxy seam. It was caused by the stiches as I was trying to put the epoxy in the seam. I mixed up some more epoxy and laid it in the seam to try and fill all of the holes.  It now looks a lot better than it did before but I think it will still need a bit of work to make it look the way I want it to. The round file works really well to clean the seam up as it fits perfectly in to the join of the boat. The only drawback is that the epoxy is so hard that it is slow work to get the finish that I want. In the end the seams will be facing the ground or the water and you won’t see them, so they don’t need to be absolutely perfect.


Nice seams, smooth and no air bubbles
This seams still need a bit of work.
You can see the air bubbles

November 4, 2011

Removing the Wires

At last the hull will now hold its self together and I can take all of the wire stiches out. They have been a necessary evil to get the boat to this point but I will be happy to see them go. I lost count of the number of little cuts and scratches I picked up from all of the wires.
Just some of the 300 stiches that i remover from the
Sasafrass 16 hull

Using some wire cutters I sniped the wire on the outside in both placers just where it came up through the hull then I would crawl under the hull and pull it out. I would cut about 10 at a time  before getting under the boat. Most of them came out easily but about 10 of them gave me trouble. The ones at the bow and stern where the wire was hard to fee in were hard to get out. Also the stiches holding the bulk heads in place proved to be very difficult. I think this was because of the number of turns and the amount of friction on the wire. Placing a soldering iron on the end of the wire for about 1 minute to heat it up helped to get some of the difficult stiches out but some of them were so stubborn that they will be staying in there for the life of the boat.

October 28, 2011

Gluing the Seams

Now it is time to glue all of the planks together. I turned the boat upside down and put it on saw horses. I had to make sure that everything was level and square otherwise I will end up with a twist in the canoe and I don’t want to spend my time paddling round in circles. I mixed up some more epoxy this time it was a little thinner. I had purchased some 10ml syringes and I sucked the epoxy up in to them and squirted it in to the gap between the two planks. It was a pretty slow process and each seam took about 30 minutes. So it took me about 3-4 nights to get all the seams done.  

Next step. Remove all of those stiches.


Gluing the planks
Sasafrass 16
Guling down the Bow
Sasafrass 16

October 21, 2011

Fillets on the Bulk Head and in the Bow


Bulk Head Fillets
Sasafrass 16
With everything stitched in place I mixed up some thickened Epoxy loaded it in to a plastic lunch bag and squeezed it in to the join between the hull planks and the bulk heads, then started to smooth it all out with a tongue depressor. It was not very easy to make a nice smooth finish and I am sure more practice would make it easier but I got there in the end. I spread thickened epoxy on the joint for both sides of the bulk head and just kept smoothing it out until I was happy. The inside of the bulk head was harder than the outside because there was so little room to work.

Then I did the same thin to the inside of the bow and the stern. Squeezing in a large amount of thickened epoxy and spreading out until it looked good. Then I got out a strip of fiberglass about 75mm wide and covered the epoxy in the bow and the stern and wet it out with unthickened epoxy. This was even harder to spread out as it just wanted to run to the bottom of the boat. I worked the fiberglass tape until the epoxy started to cure and I finally convinced myself to stop fiddling with it and let it set.

The ends are now set in place and won’t be going anywhere….. I hope I have got them right


Bow/Stern Fillets
Sasafrass 16
Bow/Stern Fillets
Sasafrass 16

October 15, 2011

Making and Fitting the Bulk Heads

I had a half sheet of 6mm ply wood that I have been moving around the workshop for about 6 months now waiting for this point, now it was time to start using it. Using the plans I started to draw out the shape of the bulk heads it was a bit tricky but I took my time and double checked every ting to make sure it was right. Then it was out with the jig saw to cut them out. I cut just outside the line so that I could fit it exactly where it had to go.
To my surprise the bulk head did not fit that well when I first went to fit it. But after about 1 hour I was happy with the fit on the first end so I started on the second one. The second end was even harder to get right. The trick is to make it fit in just snuggly without taking out the fair curve on the outside of the hull.

Once I was happy with both ends I cut a large hole in each end to install a hatch cover. This will give me access inside the ends to remove any moisture that might somehow get in there. It will also give me somewhere to store small items like lunch, car keys and a phone.

Now I had to stitch the bulk heads in to place. The stich had to pass through the hull then the bulk head and finally back through the hull before being twisted. This sounds easy but there is not much room to get your hands in to push the wire through.

Now that the bulk heads are in place the whole boat is a lot stiffer. You can still move the planks where they join to other planks but it is coming along quite nicely. I laid down some masking tape to get ready for the next step, epoxy fillets.
October 12, 2011

Tightening the Stiches

All stitched together
Now that I had it all in shape I had to pull of the stiches tight. Up until now I had only been putting 3-4 turns on the wire to hold it in place while I pulled it together. For this next step I had to turn the boat over. I set up some saw horses and made sure they were level and square so the hull had every chance of pulling up square ad even. While the hull was close to the right shape it was still very flexible and it would make all sorts of strange noises if you moved or bumped it. Now I had to put more twists on to the wires so that would take up its final shape. I also had to close up all of the gaps so that the epoxy would not leak through when it came time to glue it together.

This step took a lot longer than I had thought it would. The first reason was the copper wire was thinner than what was really meant for the job, so as I put more twist on it the wire would break and I would have to pull it out and put a new one in. This happened more time than I care to remember and was a bit frustrating. The worst part was right at the end of the boat where there was not much room to get in and work. The second reason this step took so long was because you had to make sure that you were happy with shape and that everything was symmetrical so I spent a lot of time making sure it was just right. Of course the more I fiddled the more I would brake stitches and so on and on it went.

After a lot of fiddling and a lot of broken stitches I was finally happy with the shape so I very carefully turned it back over ready for the next step.
It's a canoe - Sasafras 16

October 8, 2011

Stitching It All Together - Part 3


At Last it has come together
Success at last! This time I went out side with another plan. I stead of trying to bring the ends up and together in one hit like I had been trying in the past. I would try and do it one stitch at a time. I would put the stitch in place that was 6 holes back from the end on every plank, then move to the other end and do the same thing. Then do the holes that were 5 in from the end and so on creeping towards the ends, making sure that everything was lining up as went. With about 3 holes to go before I got to the ends it was getting very hard to line them up by hand because the planks were under so much pressure but they were now close enough that is was able to slip the specially made clamp over the end and hold it in place while I did the last few stitches. Then I did the stitches that ran down the very ends of the canoe and it was done. It even looked like a canoe now it felt great to have finally got it together. Although the stiches had drawn blood more than once i concidered that just part of the price I had to pay.


The is the clamp I used to hold it all together


It's a hull

The Bow of the Sassafras 16

October 5, 2011

Stitching It All Together - Part 2

The hull shape after the second night of
trying to pull it together
After a couple of days thinking I headed back out to try and pull the ends together. I had a few new ideas to try but nothing worked. A special helper, my wife, was going to come down and give me a hand as well she would be able to put stitches in while if tried to push planks in to the right place. She would also be the voice of reason sitting on my shoulder to say stop that is just not working.

The main problem was that as you bend the ends up they would not line up the planks that were meant to sit on the outside would jump over on to the inside and I could not get them to move back without undoing a lot of stiches and starting again. I made some braces to hold the ends in place if I could ever get them close in to the position they were meant to be.

I tried putting a strap around the hull to try and pull it in to a more rounded shape. I tried putting in a piece of wood to spread them out in the middle to stop too much shape. I tried many different ideas but nothing would work. By the end of the night we had made no progress and I had been scratched of all of the stitches on the outside as I tried to bear hug the hull in to shape.

October 2, 2011

Stitching It All Together - Part 1

Stitching the planks together
Now it’s time to stitch the planks together and finally make all of the hard work in to some 3D, hopefully it will look something like a boat. I had already cut about 180 copper wires about 6” (15cm) long and folded all of them in half. Then I placed the two bottom planks together and started to stitch. I feed the copper wire through the two holes that lined up along the bottom of the plank then twisted them a bit so they would not come undone. Once I had done almost the full length of the hull I opened it up. Then I took the next plank and placed it in place and started to drill holes as they lined up. I would drill 2 – 3 holes then stitch them in place. Then move along to the next couple of holes and drill some more and stitch them in place. I repeated this process working from the center out to the ends. I had to stop about 40cm before the end of the boat because the hull was taking up too much shape making it very awkward.

I put all of the planks in place and stitched them as I went. It currently looks nothing like a boat. In fact when I look at the ends I wonder how it is ever going to line up at the ends. It was the end of a long night drilling and stitching and I had one try at pulling the end together but it did not want to go so I gave up for the night. Sometimes you are better off stopping for the night and going back inside to think it over and come up with a better strategy instead of pushing on and breaking something. In this case the plywood was making all sorts of creaking and cracking so it was time to stop.

The weird looking hull shape at
the end of the night.
How are these plankc ever going
to pull together and line up?

September 29, 2011

Drilling Holes

The next step was to start drilling holes, about 150 holes. I made up a special gauge that was 1" wide and had 2 hols drilled on its centre line 6" apart. I then drilled 1 hole on the top of plank #4 at one end drilling through the gauge, while the drill was still in the plank I spun it roundand lined up the edge of the plank with the edge of the gauge. Then drilled the next hole and repeated this process for the full lenght of the plank. What you end up with is holes evenly spaced every 6" for the full lenght of the plank and all of them are 1/2" away from the edge of the plank. I drilled the 2 matching planks at the same time. you then repat the process laong the top of plank #3 & #2, then all the way aroung plank #1.

For some strange reason this was somthing I was really looking forward to doing. It seemd like this ment that i was really making process. The hole process only took about 30 minutes and it was over but it Felt good.